Nginx default user changed in RedHat/CentOS package nginx-1.16.1-1.el7
The latest Nginx rpm (nginx-1.16.1-1.el7) from EPEL for CentOS/Redhat is a fairly major update, from version 1.12 to 1.16, and includes some very important fixes to address multiple CVEs. There is another small but critical change in the latest RPM that isn’t mentioned in the bug report. RedHat had configured nginx to run as user “apache” in past releases, but in the EPEL release on 19 October 2019, the configuration was changed to run as user “nginx”. If you ran “yum upgrade” recently (which you really need to do on a regular basis) on any system with nginx installed, you probably have a system that is affected.
mount.cifs error 13 after update (CentOS/RedHat Linux 7.6)
PERMISSION DENIED
PERMISSION DENIED (Photo by Hidde van Esch on Unsplash)
If you recently updated your RedHat or CentOS 7.6 system, you may suddenly start getting “Permission Denied” errors when attempting to mount SMB shares via CIFS. Typical error messages in syslog look like this:
kernel: Status code returned 0xc000006d STATUS_LOGON_FAILURE
kernel: CIFS VFS: Send error in SessSetup = -13
kernel: CIFS VFS: cifs_mount failed w/return code = -13
Configuration that triggered the problem
Synology NAS with latest operating system shares a volume via SMBCentOS 7 Linux server mounts SMB share using a local username and password (NOT domain credentials)cifs-utils version 6.2 installed in May of 2019 (this by itself worked fine)libsmbclient just updated to 4.9.1-6libmount just updated to 2.23.2-61CIFS mount options: vers=3.0,credentials=/root/credentials.txt,sec=ntlmsspi* File /root/credentials.txt contained a username and password that are LOCAL to the SMB server
Updating to Wordpress 5 on a Linux Host: Requesting FTP Credentials
Wordpress 5 didn’t install automatically on sites hosted on my CentOS 7 Wordpress hosting server. That’s by design, because I’m selfish and I’d rather wait for a few bug-fix releases before making a major upgrade. When I chose to upgrade manually on a test site, Wordpress asked for my FTP credentials:
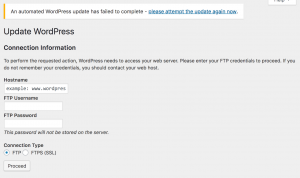
Connection Information: FTP credentials
If you’re hosting Wordpress on your own server, it does not need FTP credentials. This page is a symptom of a permissions issue with the underlying server. The web server (typically Apache) is unable to write the updated files to the Wordpress directory. From a security standpoint, this is actually a good thing. You generally don’t want to allow a public-facing service to make changes on your server. This problem occurs in other situations, such as configuring the WordFence plugin, so I’ve written a page devoted to troubleshooting Wordpress permissions on Linux hosts. That page describes how to fix the permissions issue without compromising the general security of your Wordpress host.
New Relic APM on Fedora/CentOS/RedHat with SELinux Enforcing: Solved
I found the solution for getting the New Relic APM Agent to run on a CentOS 7 system with SELinux Enforcing. The only SELinux modification you have to make is to change the context of the log file directory /var/log/newrelic. You can temporarily make these changes with the chcon command: [code lang=“bash”] chcon -R -t httpd_log_t /var/log/newrelic/ [/code] Kill any running instances of newrelic-daemon. If you’re using New Relic’s recommended default setup, make sure that the file /etc/newrelic/newrelic.cfg does not exist. Verify that all required values in /etc/php.d/newrelic.ini are correct (especially the license key and the application name). Finally, restart httpd: [code lang=“bash”] systemctl restart httpd [/code] If that works, you should see output in both /var/log/newrelic/newrelic-daemon.log and /var/log/newrelic/php_agent.log. Now, make this file context change persistent, and verify the result: [code lang=“bash”] semanage fcontext –add –type httpd_log_t “/var/log/newrelic(/.*)?” restorecon -RF /var/log/newrelic/ ls -laZ /var/log/newrelic/ [/code] When you restart Apache, it spawns the newrelic-daemon processes, which communicate with APM via the socket file /tmp/.newrelic.sock. You really don’t want to run the newrelic-daemon processes via systemd if you can avoid it. The resulting process tree should look like this:
Configure CentOS/RedHat VMs with Kickstart files on Virtualbox
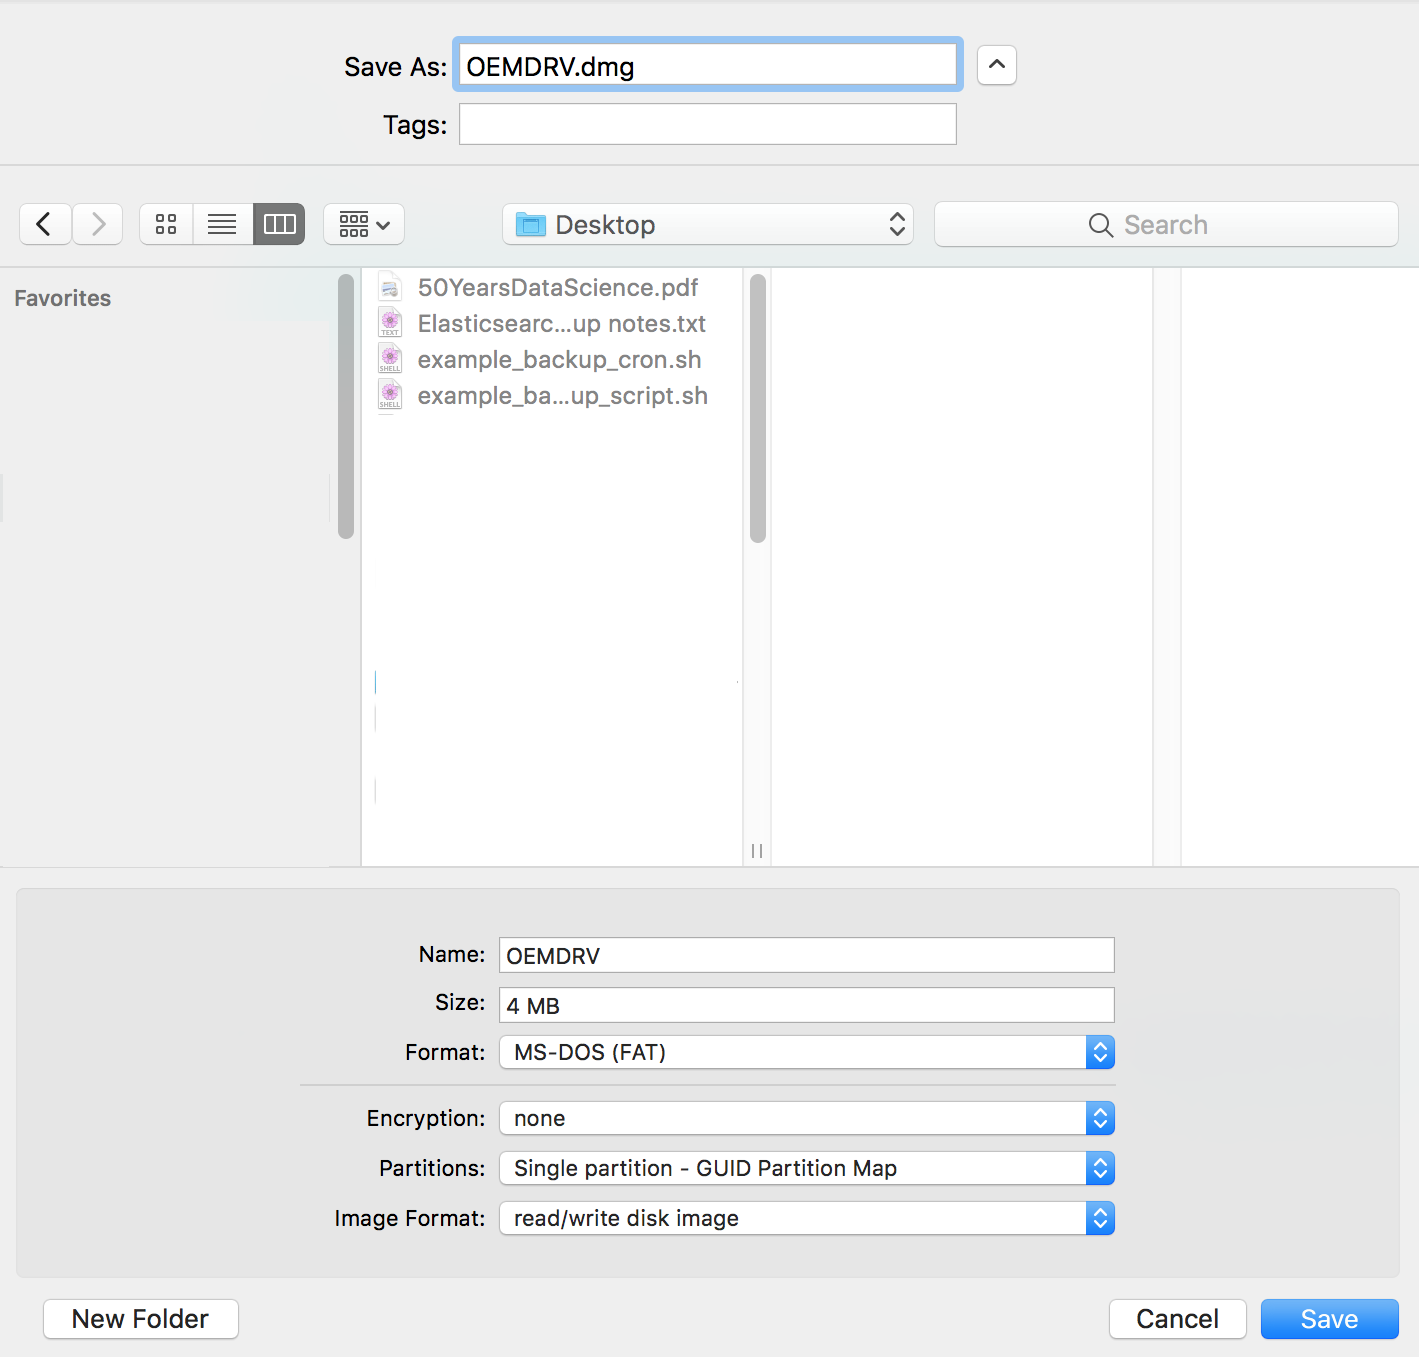
Kickstart is a type of file that’s used to automatically install RedHat or CentOS Linux on a physical or virtual server. If you are managing more than a few servers, it’s a good idea to configure the servers via kickstart files instead of logging in and configuring each one manually. However, some unfortunate choices were made when defining the Kickstart file format, and it’s not the easiest thing to use. When creating a new Kickstart or making major changes, it’s good to have way to quickly iterate and test your changes. Iterating on a Kickstart file is slow and inconvenient in an enterprise environment in which a freshly booted server obtains an image and Kickstarter file via PXEboot. To speed up Kickstart testing and debugging, I’ve developed a simple way to use Kickstart files with CentOS/RedHat guest virtual machines that run in VirtualBox on my Mac. This process should also work with Windows or Linux hosts. When the RedHat installer is booting, it looks for a file called ks.cfg on a volume with label OEMDRV. First, we will create this volume as a small virtual disk image. On a Mac, you can create this image with Disk Utility as shown below. Note that the Name needs to be OEMDRV (though you can make the filename anything you want). Create OEMDRV disk image OSX Disk Utility