Service account credentials with the Python client for the Google Drive API (v3)
EDIT: Get the full code for this post on Github. This article only contains important snippets of code that require explanation.
There are numerous ways to authenticate against the Google Drive API. If you have an application running on Google Compute Engine that needs to access Drive, a Service Account is probably the easiest way to do it. One use case is for an application to write reports or log files to Drive so that users can see them without logging into a server. Before you try this example, go through all of the steps in Google’s Using OAuth 2.0 for Server to Server Applications guide and save your service account’s private key locally in JSON format. Getting credentials from a service account file is easy:
pickle, hickle and HDF5
Danny Price recently left a comment to let me know about a new Python package he’s developing called hickle. The goal of “hickle” is to create a module that works like Python’s pickle module but stores its data in the HDF5 binary file format. This is a promising approach, because I advocate storing binary data in HDF5 files whenever possible instead of creating yet another one-off binary file format that nobody will be able to read in ten years. The immediate advantage of using HDF5 to store picked Python objects is that HDF5 files are portable across many platforms, while “pickled” objects may not be readable on a different platform. The hickle developers have made a good start, and they have a long way to go before hickle will be useful to a wider audience. Right now, hickle can only store NumPy ndarrays and Python list objects. If you only need to store lists and arrays, you might as well use HDF5 bindings for Python such as PyTables or h5py. The power of the pickle module is that you can immediately serialize almost any Python object of arbitrary complexity, store it on disk, and retrieve it. hickle will only achieve its full potential once it replicates this functionality, and I’m not sure how difficult this will be. Ideally, you might be able to derive a class from Pickler that uses Picker’s methods to serialize an object, and then add your own method to write the serialized object to an HDF5 file. In a future post, I’ll describe some of the practical problems with using pickle files to store data, and try to organize some thoughts about how they might be solved.
Building NumPy and SciPy with Intel Composer 2013 and the MKL
Since Python is widely used as a high-productivity language for scientific computing, Intel has created a page showing how to build NumPy with Intel compilers and the Math Kernel Library (MKL). I would like to clarify a few items regarding building NumPy on a 64-bit Red Hat Enterprise Linux 5.4 system. Since this is a production system, I don’t want to replace the Python 2.4 binary -2.7.3-intel-composer-2013that ships with RHEL 5.4. Instead, I created a directory called
Tricks for Writing XML with Python 3
I’ve added a Python 3 XML example to my Shocksolution_Examples repo on GitHub. The new example shows how to generate an XML file which functions as a template for building a GUI with wxGlade. However, this example should be helpful for anyone who needs to create XML files with Python. The full example is on GitHub, so I’m just going to highlight a few interesting snippets. Use the SubElement factory function to create a new Element instance and add it to an existing element. Here, I create an element called templatedata and add it to the root element. I then create another element called author and add it to templatedata.
Building SciPy with Intel compilers and MKL on 64bit RHEL 5
This is a follow-up to my earlier post about building NumPy with Intel compilers and the Intel MKL on CentOS 5. I will now explain how to build SciPy (which requires NumPy). First, download and unpack the SciPy source tarball. The following command can be used to build SciPy:
LDFLAGS="" FFLAGS="-fPIC -openmp" python2.7 setup.py build --fcompiler=intelem &> build.outI set the LDFLAGS variable to an empty string to avoid using any LDFLAGS which are defined in my .bashrc. The -fPICtells the compiler to create position-independent code, although this flag may not be required for newer compilers (ours are quote old: ifort (IFORT) 10.1 20070913 and icc (ICC) 10.1 20070913). I used the**-openmpflag to be consistent with the flags I used for building NumPy. The option--fcompiler=intelem** forces the Intel Fortran compiler to be used instead of g77. I redirected all output to a file called build.out, which is helpful for finding errors and warnings in the build output. Once you have built SciPy successfully, install it with the following command:
Building NumPy on a 64-bit Red Hat Cluster with Intel MKL
In a previous post I described how to build an optimized version of NumPy using the Intel compilers and Math Kernel Library (MKL). This post will update those instructions, since it has been a few years and I am now using NumPy 1.6.1, MKL 10.0.1.014 and Red Hat 4.1.1 (kernel 2.6.18-8.el5). First, copy the file site.cfg.exampletosite.cfg and open it in an editor like vim. The commented lines in the file give some explanation of how it works. You only need to add the following lines:
Python string format examples
The format method for Python strings (introduced in 2.6) is very flexible and powerful. It’s also easy to use, but the documentation is not very clear. It all makes sense with a few examples. I’ll add more as I have time:


Formatting Numbers in Python Strings
Formatting a floating-point number
[code language=“python”] “{0:.4f}".format(0.1234567890) “{0:.4f}".format(10.1234567890) [/code] The result is the following string:
'0.1235'
'10.1235'
Braces { } are used to enclose the “replacement field” 0 indicates the first argument to method format : indicates the start of the format specifier .4 indicates four decimal places f indicates a floating-point number
How to build ScipPy with Python 2.7.2 on CentOS5
EDIT: added –enable-shared to configure script for building Python, and added /home/yourname/lib to shared library path. This is necessary for building some packages such as pycairo (which you may need to build pygtk and matplotlib). EDIT 2: you should use the –prefix=/home/yourusername instead of –user. The prefix option places packages in the standard location: /home/yourusername/lib/python2.7/site-packages. The –user option places the packages in /home/yourusername/.local/lib/python2.7/site-packages which I think is screwed up! I use CentoOS5 because I want enterprise-class stability, as well as binary compatibility with a commercial application that is built for RHEL5. I need to use some “bleeding edge” packages, such as the latest version of SciPy, but I don’t want to affect the base stability of the system. Here is how I did it. First, with superuser privileges, use yum to install the following packages. You may need to set up epel as an alternate repository:
Removing an axis or both axes from a matplotlib plot
Sometimes, the frame around a matplotlib plot can detract from the information you are trying to convey. How do you remove the frame, ticks, or axes from a matplotlib plot? matplotlib plot without a y axis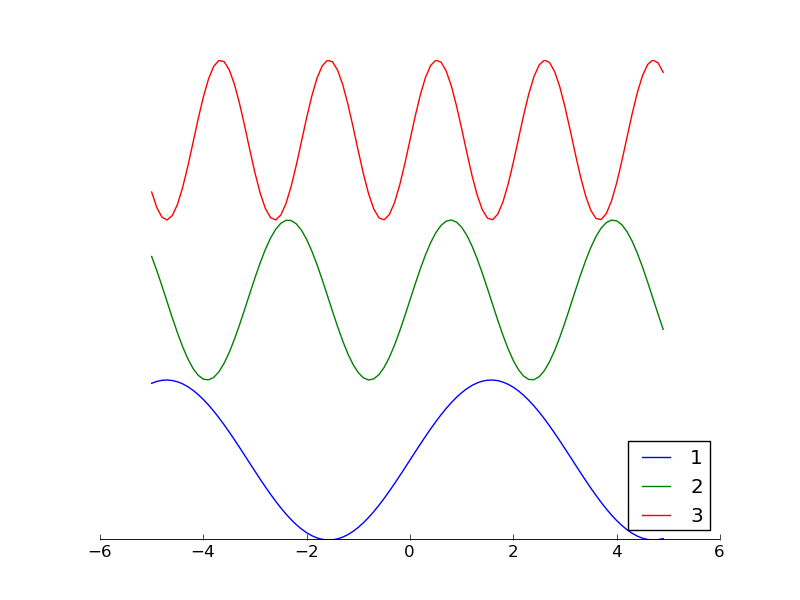
Some books you may find useful when working with matplotlib:


The full example is available on github.
First, we construct a figure and an axes object:
fig1 = plt.figure(facecolor='white')
ax1 = plt.axes(frameon=False)
The Axes object is a container that holds the axes, the ticks, the labels, the plot, the legend, etc. You will always have an Axes object, even if the axes are not visible! The keyword argument frameon=False turns the frame off. An alternative method is: