Configure CentOS/RedHat VMs with Kickstart files on Virtualbox
Kickstart is a type of file that’s used to automatically install RedHat or CentOS Linux on a physical or virtual server. If you are managing more than a few servers, it’s a good idea to configure the servers via kickstart files instead of logging in and configuring each one manually. However, some unfortunate choices were made when defining the Kickstart file format, and it’s not the easiest thing to use. When creating a new Kickstart or making major changes, it’s good to have way to quickly iterate and test your changes. Iterating on a Kickstart file is slow and inconvenient in an enterprise environment in which a freshly booted server obtains an image and Kickstarter file via PXEboot. To speed up Kickstart testing and debugging, I’ve developed a simple way to use Kickstart files with CentOS/RedHat guest virtual machines that run in VirtualBox on my Mac. This process should also work with Windows or Linux hosts. When the RedHat installer is booting, it looks for a file called ks.cfg on a volume with label OEMDRV. First, we will create this volume as a small virtual disk image. On a Mac, you can create this image with Disk Utility as shown below. Note that the Name needs to be OEMDRV (though you can make the filename anything you want). Create OEMDRV disk image OSX Disk Utility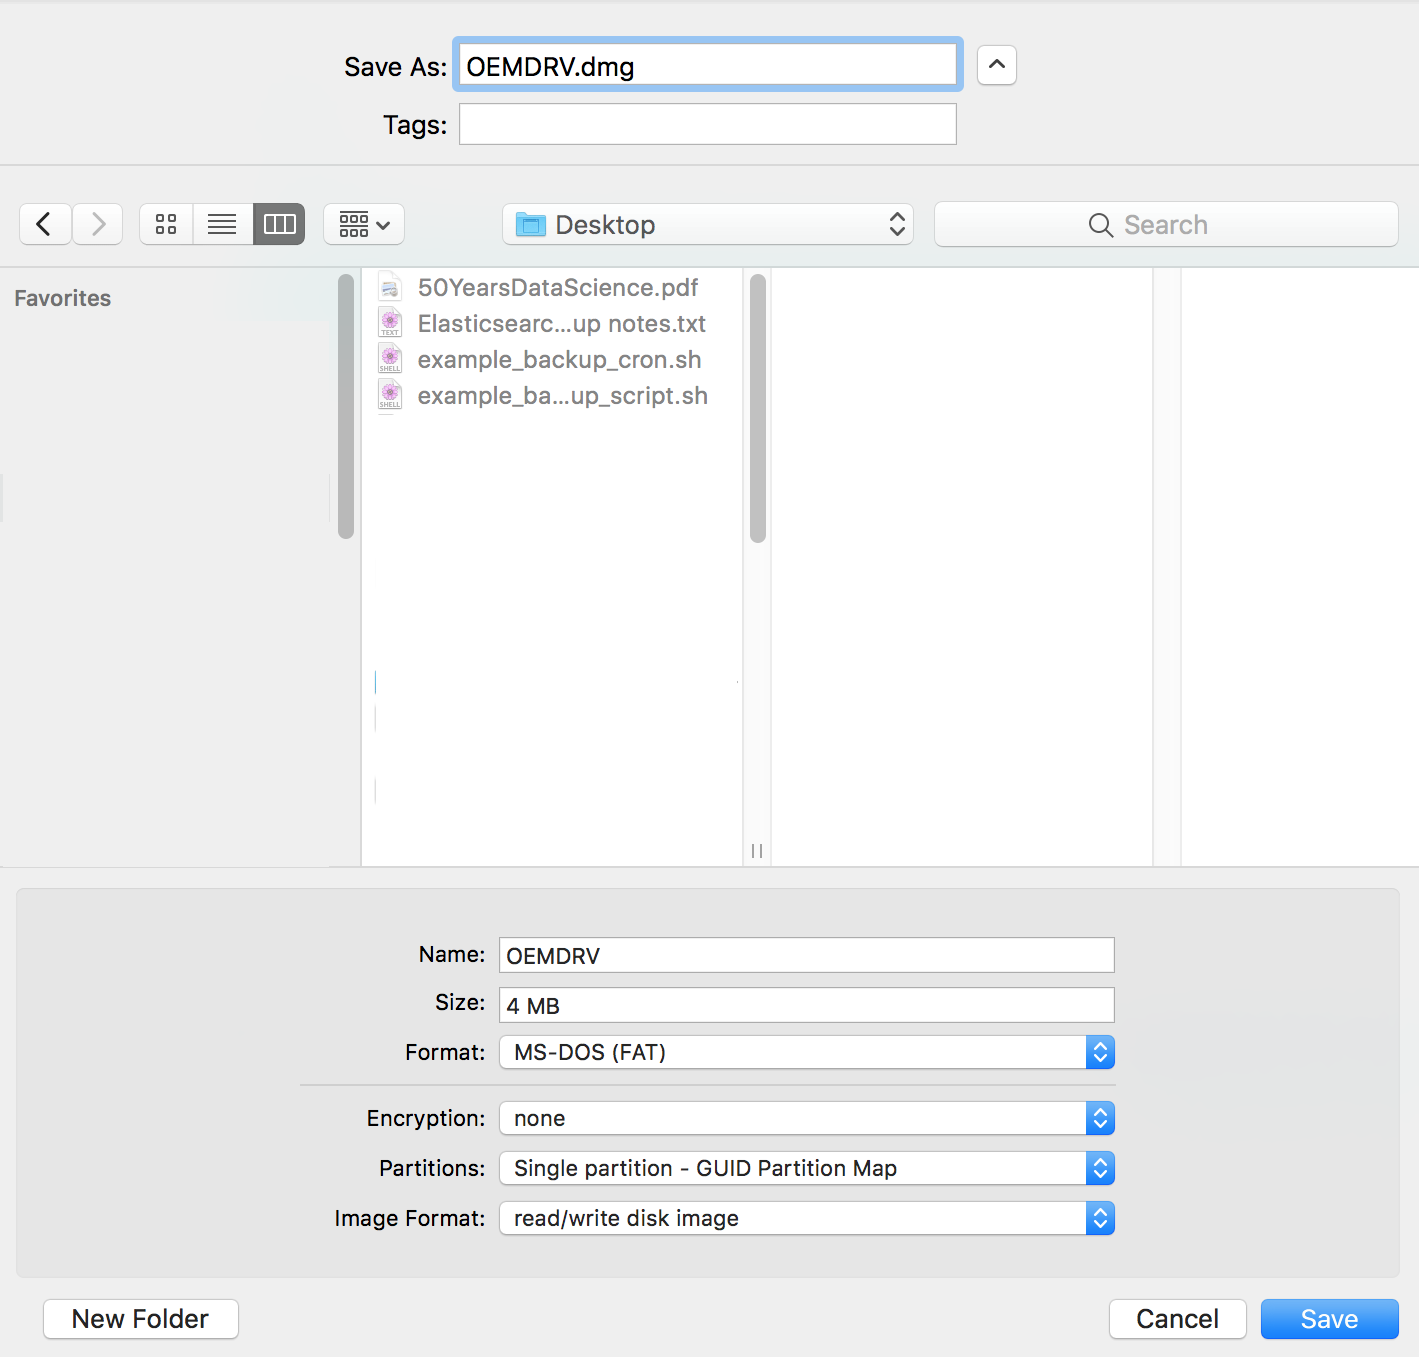
Protecting a RESTful JSON API from a CSRF attack
“Cross-Site Request Forgery (CSRF) is an attack that forces an end user to execute unwanted actions on a web application in which they’re currently authenticated” (OWASP definition)
CSRF is related to Cross-Site Scripting (XSS), but does not require the execution of Javascript or any other front-end code. In fact, APIs are increasingly vulnerable to CSRF attacks due to the emergence of single-page web applications. A single-page web application is a Javascript “client” application that executes in the user’s browser. The client application interchanges data with the server via API calls. There are many advantages to this architecture, but it does increase the attack surface for CSRF attacks. When the user authenticates, they receive a unique token with a limited lifetime, which is usually stored as a cookie. The token is passed to the server as a header on every API call, and the server may return a new token with an updated expiration time with every response.
Upgrade Ubiquiti UniFi Access Points (WAP) now to avoid KrackAttack
On October 15, 2017, security researcher Mathy Vanhoef announced the discovery of KrackAttacks, a serious flaw in the WPA2 encryption protocol that encrypts most WiFi connections. Using this method, an attacker can decrypt traffic from almost any wireless access point (WAP) and clients. Every WiFi access point will need to be upgraded with patch that prevents this attack. Ubiquiti has already released a patch for UniFi access points that addresses this vulnerability. However, the upgrade process may not be straightforward, depending on the age of your access points. The following process will ensure that you are running a safe version of the firmware (3.9.3.7537 or later). Note that any upgrade will result in downtime for each access point as it is upgraded, so you will want to perform a rolling upgrade if you have multiple devices that will be upgraded while people are using them.
Warning: CentOS/RedHat 7.4 installs FreeRADIUS 3 with breaking changes
When you run yum upgrade on a CentOS/RedHat 7 instance, you will be upgraded to 7.4. If you have a FreeRADIUS server, you will be upgraded from version 2 to 3, and your server will likely stop authenticating! Good times! Fortunately, the solution was not complicated for us, because we had good documentation.
Symptoms
Your radius server suddenly starts denying logins.
Diagnosis
The configuration file /etc/raddb/radiusd.conf has changed enough between versions 2 and 3 that you cannot re-use the old version. To get radius debugging output, stop the radiusd service, and run (as root):
Managing persistent disks on Google Compute Engine
It can confusing when you have multiple persistent disks on an instance running on Google Compute Engine. For example, a server may have separate disks for the filesystem root, MySQL data, logs, and /tmp. Once you’ve created the Compute Engine disks and attached each one to the instance, how do you know which Compute Engine disk maps to each volume on the instance? First, describe the instance to see a list of the attached disks:
Is there a "Primary Domain Controller" in Active Directory?
The Historical Answer
With Windows NT, prior to the advent of Active Directory, there was one Primary Domain Controller (DC) per domain, and every other DC was a Backup.
The Modern Answer
When Active Directory was introduced with Windows 2000, domain controllers became fully multi-master. There is no primary domain controller. However, there are two caveats that may confuse you.
FSMO Operations Masters
Though Active Directory is multi-master, certain operations must take place in a way that ensure consistency across the domain controllers. For this reason, one DC will be designated as the Operations Master for each role. This is notthe same thing as a Primary Domain Controller, because there are currently 5 master roles, and a different DC could hold each role. To view the current Operations Masters, run the following at a Windows command prompt: NetDOM /query FSMO In Powershell, you have to run two commands: Get-ADDomain | Select-Object InfrastructureMaster, RIDMaster, PDCEmulator Get-ADForest | Select-Object DomainNamingMaster, SchemaMasterReferences:
Making Windows work for Linux and OS X admins
If you are a Linux or OS X power user, then you’re used to having all the necessary tools built into your OS. When you log into a Windows system (What! No command line?) you may feel lost. These tools and shortcuts will help you be productive on Windows systems.
Windows Shortcuts
- Alt-x is a magic shortcut key on Windows 8 and Server 2012. It pops up a little menu in the lower right corner of the screen which contains just the items that an admin needs. Try it!
Windows Programs
If you want Windows to work a little bit like Linux or OS X, you need to install a few of these free programs. Some are gratis, and some are libre.
Monitoring with SNMP, Part 2: Command-line tools for active SNMP
In Part 1, I summarized the basic concepts of SNMP and defined the terms and acronyms used in this post. Now, I will show how to use SNMP to monitor actual devices. As an example, I will monitor an enterprise-grade uninterruptible power supply (UPS) and power distribution unit (PDUs) from Tripp-Lite. These devices have an SNMPWEBCARD installed to support communication over Ethernet. Command-line tools for SNMP communication should be available for any Linux distribution (or any other UNIX-derived OS). Documentation for the basic SNMP tools is available online. The challenge with SNMP is figuring out what parameters are supported by a particular device. Most devices support a set of standard OIDs that return basic information such as device name, uptime, etc.
Monitoring with SNMP, Part 1: Fundamentals of SNMP
SNMP is a protocol for conveying information and controlling devices over a network. SNMP can be used in two ways:
Active: a device sends a command to set a parameter or request information for another device Passive: a device sends an alert (called a trap) to another device, which is configured to receive traps and do something with the information.
The “payload” of an SNMP message is called an Object Identifier, or OID. An OID is an ordered list of non-negative numbers, such as: