Generating VTK files with Python
Paraview is an industrial-strength, open-source 3D visualization program designed to visualize large data sets created by computational fluid dynamics (CFD) simulations. Although its native data file format (.vtu) is designed for reading in point- and cell-based data from CFD simulations, I have successfully used it to read in and visualized discrete particle data from a Brownian Dynamics (BD) simulation. Below, you can download a Python class that is useful for visualizing particles in motion. It should be easily adaptable to any type of discrete data set that involves discrete objects, vectors, and/or scalars. In addition, this class should be useful with any application based on the VTK toolkit because they also read .vtu files.
The Python .vtu Generator
This is the first release of a Python class that writes serial, unstructured VTK files (.vtu) in XML format. Even if your application is very different, I think this class will be useful as an example of how to write valid VTK files in the new XML format. Download the class definition at GitHub. The class is used as follows. Brownian Dynamics is a method of simulating the motion of colloidal particles in a liquid. I need to visualize the particles–where they are, where they’ve been, and what forces are acting upon them. First, I create an object (let’s call it vtk_writer). Every time I need to see what’s going on in the simulation (perhaps every 5 time steps), I call the method vtk_writer.snapshot(filename, x, y, z, …) to write out a .vtu file. The object keeps track of every .vtu file that has been written. At the end of my simulation, I call vtk_writer.writePVD(filename) which writes out a .pvd file that contains all the filenames of the .vtu files. Using Paraview, open the .pvd file, and all the .vtu files will automatically be loaded. Reference: VTK file format documentation
Reading XML Data into Paraview
screenshot_thumb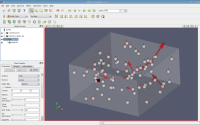
Creating Movies from Paraview
From the File menu, choose “Save Animation”, choose a directory, and enter a filename. Paraview will generate a .jpg image for every frame of your animation. You then need to use a third-party tool to turn the images into a movie. You can do it with ImageMagick, but I don’t recommend it if you have more than a few hundred frames. Imagemagick loads every image into RAM before creating the movie. A better way is to install mplayer (use the “encode” USE flag on the Gentoo ebuild). Then you can use the command line tool “mencoder” to create the movie much more efficiently. I had some trouble getting Windows Media Player 11 to play the movies created with mencoder. I used the following command line to create Windows-compatible mpeg movies:
 mencoder "mf://*.jpg" -of rawvideo -mpegopts format=mpeg1:tsaf:muxrate=2000 -o output.mpg
 -oac lavc -lavcopts acodec=mp2:abitrate=224 -ovc lavc
 -lavcopts vcodec=mpeg2video:vbitrate=1152:keyint=15:mbd=2:aspect=4/3
Reference: creating movies with Imagemagick
More references
Comments
Comment #1 by Updated Python class for writing Paraview (VTK) (.vtu) files | as through a mirror dimly
Updated Python class for writing Paraview (VTK) (.vtu) files | as through a mirror dimly - Jan 5, 2009
[…] have released a new version of my Python class that generates VTK data files in the .vtu format, which is compatible with Paraview and other VTK applications. If you have downloaded the old […]
Comment #2 by Uriel
Uriel - Mar 5, 2013
Thanks for the script! I’m using Paraview to visualize drifters in the ocean and it works like a charm. Do you know if it’s possible in Paraview to visualize the path (or tail) of the particles?
Comment #3 by Craig
Craig - Mar 6, 2013
I don’t have Paraview in front of me, but I would suggest looking into vtkParticleTracer, vtkParticlePathFilter and vtkStreaklineFilter. If you get it working, it would be great if you could contribute an example.
Comment #4 by Uriel
Uriel - Mar 0, 2013
Thanks for the suggestion. The filter that does what I was looking for is “TemporalParticlesToPathlines” (Paraview 3.98.1). It’s straight forward to use it, but maybe it’s worth to mention that: (a) It’s important to assign an ID to each particle (I’m using the color field) and select it in the filter option under “Id Channel Array”. This is vital if the number of particles (or the order) for each time step changes. (b) Make sure that “Reprensentation” is set to “Points” otherwise it won’t work (It’s set to “Surface” by default). Here’s an example: http://www.youtube.com/watch?v=C7oLGCEC4pU
Comment #5 by Slavik
Slavik - Jul 3, 2014
Thanks a lot for the script, seems to do a proper thing for particle-in-cell simulations. There are several things that can improve it, e.g., you can go for just a dictionary of additional particle characteristics to make it more general; or you don’t need to import xml in two methods, just do it once. Also, when working with files I guess better syntax to use is: with open as… Thanks!
Comment #6 by Craig
Craig - Jul 3, 2014
Feel free to fork the repository on GitHub, make improvements, and submit a pull request.